Wednesday 31 August 2011

slide and pivot

Sewing has continued apace here as well. That pace has been slow, almost glacial: my sewing progresses incrementally, one small task by one small task. After attempting a chiropractic full bust adjustment on the Vogue 1573, I decided to go a gentler method with 'slide and pivot', following the directions in Nancy Zieman's Pattern Fitting with Confidence.

In (very) short, her method involves sliding the pattern piece along whichever dimension you are altering and then pivoting at the relevant intersection of sewing lines. For example, I wanted the shoulder to be a half inch narrower so I traced the pattern, then slid it a half inch along to the right, thereby narrowing the shoulder.

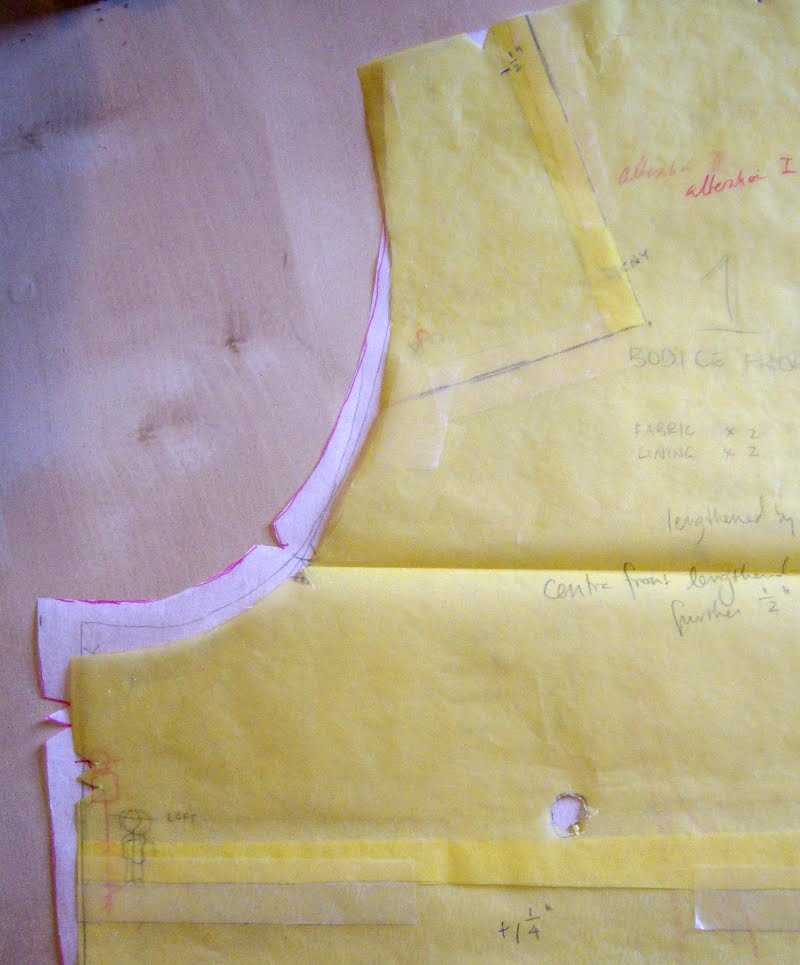
Next step was to place a pin at the point where the sewing lines for the shoulder and armscye intersect and pivot the printed pattern sheet to the left until the printed bodice side seam and my traced bodice side seam met each other. Then I traced the new armscye. This did have the effect of apparently raising the underarm but Nancy promises that this will be ok. I also did an adjustment to add a half inch to the bust. You can see above where the various iterations of the underarm have been.

I really like this book and Nancy's style of presentation. It's quite easy to follow and very reassuring. The great benefit of this method is that it does not change the shape of the armscye at all so there is no need to alter the sleeve cap. At right is my initial (yellow) full bust adjustment laid on top of the 'slide-and-pivot' version. Slide and pivot does give more room which is what I was needing. Next up, another toile!

Thursday 25 August 2011

jarrett

Hooray!

The Vital Statistics
Pattern:
Jarrett by Kim Hargreaves from Rowan's Vintage Style.
Size: Medium with extra length in the arms.
Yarn:
Cascade 220 in shade Walnut Heather; almost eight skeins.
Needles:
4mm and 4.5mm.

Stash/recycle content: Just a little bit. I added elbow patches that I cut out of a rather ugly suede skirt purchased at Bellevue Goodwill. I actually bought the skirt to cut out elbow patches to mend a friend's husband's sweater but the suede turned out to be just the right shade for this project too.
Start to finish:
15 March to 13 August 2011 - five months, not bad.

Comments: I put a lot of effort into this knit! I learned and used the long-tail tubular cast-on for hems and cuffs, cast off the neck in similar fashion (not sure where the link is for that one but it involved Kitchener stitch), lovingly knitted the button and buttonhole bands until they fit when gently stretched, single-row buttonholes, a row of slip stitch crochet to reinforce the neckline, and quite a lot of stocking stitch.

I did knit the moss stitch elbow patches and shoulder flaps, I even crocheted around the edges to try and neaten them up but they just didn't work for me. Instead I sewed on very professorial leather elbow patches and dispensed with the shoulder flaps altogether.

The buttons we purchased together at my beloved The Button Shop in Melbourne when we were there in April.

Verdict: Pretty happy. Tim is over the moon that I have finally knit a garment for him (this was my first men's garment!) The fit is good in terms of the size I chose and the sleeve length but still I think the design itself is a bit roomy in the upper sleeves.

Oh and that old-fashioned knit-the-button-band-separately construction is such a pain. And so outdated. Knitting this has made me really curious to take a closer look at the seamless knits that are around. Sometimes it seems as though new designs are just the same old cardigan or sock with a different lace stitch plugged in but seamless construction, top-down set-in sleeves - it's exciting that there is still room for innovation in knitting. Speaking of which, next up for Tim is Brownstone in brown; ok, 'espresso'.

Monday 15 August 2011

summer snowballs

After a reasonably calm June and July, summer has just started to snowball in August. Friends from San Francisco to stay, a weekend in San Francisco for miss bear and I, a visit from my mum, an upcoming visit from relatives of Tim, and all sorts of getting ready for school activities. That's right, miss bear is off to school on 7th of September. Unbelievable.

And a visit to the snow, truly, in the middle of summer. We visited the absolutely incredible Big Four Ice Caves: "Formed from cascading water and warm winds hollowing out heaps of avalanche-deposited snow, the caves usually appear by midsummer."

The ceiling, so to speak, of these hollowed out caves has an amazing texture, formed I gather by the droplets of water. No stalactites but this concave baffled effect. The picture is hazy because there is icy water vapour pouring out of the caves the whole time.

It was a great walk on a beautiful day and I really felt like I could be nowhere more beautiful in that very moment. Strongly recommended for anyone who lives in or is visiting the Seattle area. And because they are naturally formed, or rather re-formed, every year, every year they are different. I can't wait to go again.

Friday 12 August 2011

the sincerest form of flattery

As someone who likes to make things, I often find myself in the diy dilemma or the crafter's conundrum - when I see something lovely, my first thought is, 'how could I make that myself?' This thought often keeps me from actually making purchases (not a bad thing) but I frequently don't get around to actually making the item in question myself.

And then, sometimes I do, like this time. I saw this wonderful necklace by cursive design on Elly's garment house blog. And because I liked it so much, and because I wanted one for my very own, and because that self same day I found the perfect twig when I was out walking; because of all this, I did it. I made my own.

Besides than the free twig, other materials that I used were a length of sterling silver wire (about 20 gauge I think), a Czech glass bead, a sterling silver chain and some round nose pliers, all of which I purchased at Fusion Beads. The yarn that I used was some leftover laceweight Habu (I think) that was given to me by a friend when she moved to New York (and she initially received it as leftover from someone else).

I threaded the wire through the bead and then wrapped the thread along the twig, holding the wire in place, to both ends where I made little loops to hold the chain. I used some Elmer's glue to secure the yarn. In all it took me about a week to gather all the materials and complete it in fits and starts

A couple of other things that I would make in a flash if I had the time and materials. Where does one find amazing eyelet fabric like that and the patience to do all of that smocking?? Designers are Isabel Marant and Bottega Veneta respectively.

vintage sewing patterns

Oh dear, I have a bit of a new obsession - vintage sewing patterns. And the internet makes it so easy (although not easy on the bank balance, they can be really pricey!)

I am loving the lines of the designs from the 1930s. I bought this one on the left but sadly missed out on the one on the right.


I do have a number of questions though about these vintage patterns - firstly about size. How do the vintage sizes compare with current sizes? I am confident that I am a modern 14 but I know that these old patterns were drafted very differently. And the brands - my internet travels have come up with Hollywood, du Barry, and Advance as well as the familiar Simplicity, McCalls and Vogue. Any opinions?

Tuesday 9 August 2011

in my head

Of course, the perfect place to find rocks.

Things do feel a bit hectic in my head at the moment. Suddenly it is August and everything has become really busy. We had house guests this past weekend, my mother arrives tomorrow afternoon to stay for ten days, there is some travel planned (west coast), more house guests, a birthday and then it's back to school.

I have also enrolled myself in a class at the local community college which will start in late September. It's not finalised yet but when it is, I'll be very excited to tell all about it. Then there is more travel (east coast) and a week alone with my littlies. So much to look forward to!

Everything here continues apace and new things are added every day. I'm making some jewellery, planning to draft up a toile specific to my measurements which were taken by a friend last weekend, then I will draft the swimsuit. And rocks, adding to my rock collection.

Friday 5 August 2011

my pet rock

I oiled the squeaky hinges of our bedroom door with the unintended side effect that it will no longer stand open. Time for a pet rock.

The Vital Statistics
Pattern: I have registered this concept on my journeys around the (internet) traps but never really took note. Some post hoc searching leads me to think that they may have originated with Beata of Fly Along. I took motif 128 from Sasha Kagan's Crochet Inspiration and after completing the triangular motif winged the rest.
Yarn: DMC coton perle 5 I'm guessing.
Hook: 1.75mm steel hook.
Start to finish: I made it today.
Stash/recycle content: Hooray, thread from the stash! Rock from the park.

Comments:
This was actually a pain to make! Well, the first motif part was easy but getting it to fit around the rock - ugh. And too much thinking: is the rock the right shape? is the thread the right shade? is it the right weight? is the motif the right shape? the right density? Too much thinking and it's hard to just get on with it.

Verdict: It will do the trick. And the endless possible combinations of rock and thread and motif could keep me busy with more of these for a long long time. Bit of an ethical quandary about rock sourcing though. I asked some children that we were with to help me find a suitable rock as a way of inducing them to continue upon the path towards home but I insisted that the rocks not come from private gardens. We ended up picking one up on the path that cuts down from the road to the park. Which I guess is ok but if everyone took a rock the hillside would possibly collapse. I could buy one at a garden supply store I suppose but that would kind of defeat the purpose ...

Thursday 4 August 2011

sticky little fingers

I seem to end up with all sorts of greasy stains on my t-shirts. I like to think that it comes from constant pawing by sticky little fingers (ok, and maybe also because when I drop food it doesn't land in my lap). So, in order to avoid prematurely retiring a stained red t-shirt, I have been pondering some embellishment options.

Embellishment - hmm, just the word gives me the shivers, redolent as it is of bedazzled connotations (I would like to note that blogger's spell check does not even register bedazzled). Anyway, I have this fine, wide grosgrain ribbon which I think is quite refined, not even remotely dazzling, and am considering how I could drape it across the t-shirt in question. Of course, I would need to iron it, and it would sit flat, and it would probably be better to model the options in 3-D; nevertheless, any opinions? I quite like the ends tucked in to the neckline (so that I don't need to finish them) but also don't want it to look as though the t-shirt chest is spewing ribbon.

And I would only gently baste it down as another greasy mark is sure to appear somewhere else sometime soon. And then I will either have to rearrange the ribbon or think of something else.

Wednesday 3 August 2011

july reading

The Complaints by Ian Rankin - Good. Complicated. Perhaps a bit too complicated. Perhaps compensating for a new character and development thereof. I do miss Rebus.

The Quilter’s Apprentice by Jennifer Chiaverini - Much better than expected. And just as well because there are 16 more books in the series and, well, I love a series.